Pictures soon
Blog is continued on: shariandericbosler2.blogspot.com
It appears that blogger has a new format that is not working correctly. As soon as they work out the bugs, we will post pictures for last week.
It appears that blogger has a new format that is not working correctly. As soon as they work out the bugs, we will post pictures for last week.
Deck railing

Exterior siding was completed this week and installation of our deck railing began. Post and rails of the system are the same material as the deck. Balusters are anodized aluminum tubing, strong but with minimal visual interference.
8/4 - 8/8 - Basement bath

With the installation of a tub/shower unit in the basement, we will soon have our first functional bathroom.

The final hookup of the well to the house water system is now complete. A couple of items remain, including the water heater.
8/1 - Basement bath
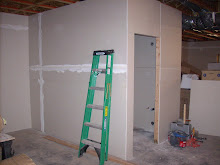
Under our sheetrocker's tutelage, Eric hopes that his sheetrock comes out as well as Garret's.

The carefully applied finish really shows off the "reveal" of our windows.
We have stripes!

At this stage, the sheetrock joints have a layer of tape and 1 top layer of "mud." Unlike an amateur who typically installs 2 boxes of "mud" and sands off 1, our sheetrocker has the tools and skills which will result in minimal sanding.
7/28 - What a mess!

There is no neat way to do drywall. Currently there are eleven 3.5 gallon boxes of "mud" on our walls.
7/22 - Great news -- clean water!
Our well has passed the test required by Klickitat County Health Dept.
7/21 - Sheetrock taping

This is a short week for Eric, as we are off to Master Gardener Mini-College. Fire taping is done in the garage and, yes, we've moved the first piece of furniture.
7/18 - Camp Wana-build-abode

Eric's deluxe accommodations have again been relocated. It moved outside so that he could sheetrock the garage ceiling (code requirement).
Gutters

The gutters are complete and add a nice finishing touch to the roof line. Also, a place to hang, yes, a hummingbird feeder. It's already being visited by a female Anna's who is nesting in the area.
Window reveal

With sheetrock in place, it's easy to see the deep reveal that surrounds the windows and doors on our exterior walls.
7/14 - UFO siting

It might be a UFO looking for the droid units, but actually it's the Solatube which is in the kitchen area, directly above our island. Great light source!
7/11 - Exterior trim

Our contractor's crew has moved on to trimming out the posts and beams on our deck. Note the gutter. More later on exterior trim.
Basement sheetrock
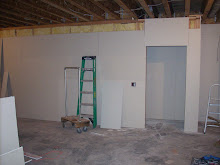
It turns out that the building code requires that the Arxx block must be covered inside as well as outside. This means that the basement walls must be sheetrocked before occupancy. This unplanned project is Eric's responsibility.
Great room

The sheetrock really allows one to get a feel for the great room. Our master bedroom is through the small door on the right and the deck is out of the large slider and windows that make up the entire south wall.
7/7 - More sheetrock

Putting sheetrock up in a room with 12' ceilings is easy for a sheetrocker (Garret) who is 6'6" tall.
7/4 - Assistant Master Gardener!

One of Shari's challenges will be dealing with "neighbors" who insist on pruning anything they find edible.
Bucket on a stick

Every trade has special tools. Our sheetrock contractor uses one of these, and Eric made one for himself. It's a great "step stool."

Construction code requires sheetrock on the ceiling and house wall in the garage. Code also requires that all interior surfaces of the Arxx block be covered to comply with fire code. Eric is doing the garage, breezeway, and basement.
7/3 - Sheetrock everywhere!

The ceiling insulation was completed on Monday and the major activity for the week was sheetrocking of the walls.

The septic drain field begins at the distribution box (now covered) and continues to the inspection tubes on the left side of the photo.
6/30 - Septic system complete

The distribution lines and soil-covered domes complete the septic system.
6/27 - Final grade

With the removal of the remaining soil from the basement excavation, the final grade reveals the character of the front of our new home.

For those of you not familiar with a septic system, this tank holds the waste from the house and distributes the liquid portions to a drain field which will be installed next week.
Septic tank

First dig a hole 6' x 10' x 8', then fill it with a 1,000 gallon concrete tank, and you have the beginning of a septic system.
6/26 - More excavation

While drywall is going on inside, Gross Excavation has returned to grade the front of the house and dig out for our septic tank.
6/20 - Attic insulation

As soon as the "cap" is in place, our insulators will return to blow in the insulation in our attic space.

The ceilings ("caps" in the trade) are the first to go in.

Stocked and ready for installation. Some panels of 1/2" are 54" wide x 12' long.

These panels of sheetrock are 5/8" thick x 4' x 12'. The wall board lifter makes easy work of getting more than 180 sheets up on our main floor. Just the thought of doing this by hand strains the back and boggles the mind!!
6/18 - Sheetrock delivery

The last major delivery for our project is the sheetrock.
Gas fireplace

The fireplace and wood stove chimneys share a common chase up through the roof. The gas fireplace is in the great room and the small woodstove is in the basement.
6/13 - Friday, the 13th

Lucky day, we're in the pink. It took nearly 20 years to get rid of all the old pink paint in our house in Portland. Now, we have "pink" walls in White Salmon. Insulation has begun and sheetrock should start next week.
6/9 - Rough-in punch list

A punch list is simply a list of small items to be completed prior to a major shift in construction. In this case, the punch list must be completed prior to insulation and sheetrock. These valves are in the laundry room.
6/6 - Building permit

Visually, the work completed this week offers nothing new. However, the week resulted in a couple of milestones. Inspections were completed and we received approval on the electrical line and low voltage, the plumbing and framing. Next major steps are insulation and sheetrock.
6/4 - Line and low voltage electrical permit

Front deck

We are looking forward to spending considerable time on the deck off of our great room and bedrooms. As it is 10' off the ground, the railing will be very important.
"Services"

Our west wall has sprouted a variety of devices which facilitate the basics, like gas, telephone, and air conditioning.
5/30 - Electrical rough-in

This was a week of "completions." Electrical rough-in is complete and waiting for the inspector to sign off on the permits.
5/27 - Master bath shower

At 350+ pounds, it's unlikely that our shower base will be moving. This was the last item we needed to install to complete the plumbing rough-in.
Decking begins

The construction crew was able to begin removing our lovely plywood decking and replace it with the composite deck system.
5/23 - Water heater vent

The on-demand water heater relies on a stainless steel vent to exit exhaust gas. Without a doubt, the most expensive per square inch item in the house!
5/22 - More androids

New (strange) devices keep popping up. The gray tank is for pressure control on our well. The white unit is an on-demand hot water heater.
Ladder or Rack?

No sooner was work completed on the plumbing than it was back to the ladder to install low voltage wiring for phone, TV, and alarm system. The ladder is beginning to resemble a midevil torture device.
Pressure test

Within 15 minutes of making the last connection, the system was pressurized to 50 psi. Changes in temperature fluctuate the reading by 1 psi, but other than that, there has been no leakage. The pressure guage needs to remain connected until after inspection.
5/20 - Running water

Hot and cold running water will be part of our amenities. Pictured is the distribution manifolds for the water service. Basically, each area supplied with water has its own lines and shut off valves. Previously Eric has worked with galvanized pipe, PVC, and copper piping. This is his first experience with PEX. The system is based around flexible plastic water lines. This system is known as Wersbo and we learned about it from our neighbor, Rick Streedain. Rick is right! "It's almost cheating!"
5/16 - Spring time bloom

The lilacs along the east edge of our site are in full bloom and the scent is wonderful! We're very glad we insisted that the excavators avoid these during initial construction.
5/15 - Sprouting

As it's spring time, things seem to sprout out of walls and floors. The drain/vent and water runs are complete.
5/14 - Refuge

The small C3PO (recessed light cans) have found safety by crawling into our rafters. Rough-in electrical is nearly complete.
5/12 - family housing

White Salmon is experiencing a spring boom in housing. Several pairs of robins have decided that our new home is perfect for their new homes. Daily, Eric has needed to knock down the beginnings of nests as he doesn't want to displace nested robins when it come time to install the ceiling.
5/9 - Current view

A rare moment without vehicles or equipment parked in our driveway allowed for this photo which gives a fair idea of the character of our new house. The view is from the northeast, our "back door."
5/7 - Clones

The "C3-PO" units that were actually part of the HVAC system have spawned little units which are actually recessed light cans. Rough-in electrical continues and these fixtures are being installed.
5/5 - Water lines

Still no enemy submarines, but the house is beginning to sprout water lines.
Grandma time!

During the planting weekend, Shari enlisted the help of Jarrett with some laundry.
Family Block!

A recent weekend spent in The Dalles allowed Shari and Eric to participate in a "family project." This is part of 6 acres of new cherry trees that Megan and Jeremy have planted in their orchard. The weekend also provided considerable "grandma time" as Shari watched Jarrett as the crew, including June and Jim Thompson, planted.
5/2 - Shari's spa

With the positioning of the tub in our master bath, the effect of the block window starts to take shape.
4/30 - Guest bath tub

There will be hot baths/showers for guests. The cast iron tub took 3 of us to wrestle into place.
Up periscope!

There really is not an enemy submarine in the basement. The two black pipes will form the drain and vent for our kitchen island sink. The cardboard on the floor lays out the cabinet locations for the island.
4/28 - Plumbing rough-in

Another job that uses a chain saw! Rough-in for waste and vents located on any outside wall means that you use a chain saw on your new house. It's the easiest (and messiest) way to cut access for pipes. After installation, a spray foam is used for insulation.
4/25 - Breezeway doors

The breezeway entry doors have been installed. Note the dog door.
Siding

With the exception of a few minor details, the siding is complete. The remaining exterior wall surface (blue area) will be covered with a stucco-like material.
4/21 - Wiring rough-in

The Arxx wall system requires the use of some tools which are unusual in certain trades. When it comes to running electrical wiring, the tool of choice is a chain saw. Slots are cut in the walls from plug or switch locations and the wire is pressed in.
4/18 - HVAC rough in complete

Under the direction of Hammerhead Heating, the C3PO units and gray snakes are all in place. This completes the basic HVAC system.
Dog door

The dog door has been installed. The rough opening was moved from the west end of the breezeway to the east.
4/17 - North wall

The last of the windows are installed and the siding is in place on the north wall. Siding is nearly complete on the entire house.
4/15 - Hot baths

Not quite yet, but on the way.
4/14 - UFO?

The appearance of a new device usually means a new phase of the project. This wire reel indicates that electrical wiring has begun.
4/11 - Siding continues

As Eric was busy in the basement, work progressed on our windows and siding. The block window is the 3rd window to the left of the corner of the house.
Furnace/AC

This unit will pump warm or cool air to the C3-PO units and gray snakes providing us with heating or cooling.
4/8 - Star Wars??
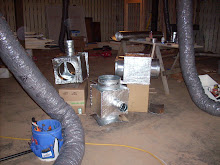
The basement looks like a set production area for "Clones of C3-PO." The HVAC ducting is covered with an insulation material which is like foil-covered bubblewrap. The gray snakes are flex ducts to the various floor registers.
4/7 - Master bath block window

In all the houses we've owned, Shari has always expressed the desire for a "glass block" feature. It's finally happened. This is the window in our master bathroom.
Inspection!

A 4-legged neighbor dropped by to see the progress. No, deer don't drive red sports cars in White Salmon.
4/4 - Siding continues

Installation of the siding has progressed and you can see what the "invisible corners" will look like (lower level next to scaffold leg).

Installation of the 8'x8' sliding glass door completes the great room south wall.
4/2 - Another power tool? Painting fascia and soffet

Our goal was to have a home with no stairs on our living level and no need for ladders. Oops, the wonderful decks will offset the disadvantage of gutters which are 22' above the ground on the south wall. Guess that's what a neighborhood handiman is for.
3/31 - HVAC installation begins

Part of construction is destruction. First step of installation in a heating and air conditioning system is to cut holes in the floor. A variety of sheet metal forms create the vents through which hot or cold air is blown.
3/28 - Spring?

Just to remind us who really has control over man's endeavors, Mother Nature conspired with the Evil Snow Queen to give us just enough of the white stuff to screw up Friday's work schedule.
3/27 - HVAC

The heating and air conditioning components have been delivered. Installation to begin next week.
3/26 - Eric's paint shop

The dry basement has proven to be an excellent location to set up a paint shop. In progress is the tongue and groove lumber which will be used over the deck areas.
3/24 - Entryway

With the roof complete, work can begin on those things that must be kept dry. The main entry door has been installed.
3/23 - Easter '08

Grandma time included Jarrett's first Easter egg hunt. Megan, Jeremy and Jarrett searched for eggs in Grandma and Grandpa Thompson's backyard.
3/22 - Site visit

Project superintendent, Shari, is on site for a brief visit prior to going to The Dalles for "grandma time."

Roof is complete and siding has begun. The chimney chase is in place and ready for flues.
3/19 - Great room windows

The windows on the south wall of the great room are in place and only the sliding glass door remains to be installed.
3/14 - We have a roof!

At least, we will by Saturday afternoon. The roofing crew took Thursday off, due in part to rain, but mostly left over results from the lead roofer's 30th birthday party.
3/12 - Soffett

Eave soffets (photo), fire blocking, vent blocks, and fascia tend to get lost visually among all the wall studs, rafters, trusses, and joists. Next up will be windows, some trim, and siding.
3/10 - Outhouse art...Creative carpentry!

This week does not promise a lot of visual changes, but these actual scraps of plywood could not be ignored. Complex hip roofs require some odd shapes and result in odder scraps.
3/7 - Another new feature

The end of the week found windows in the garage and the electric service panel roughed in.
3/6 - Basement windows
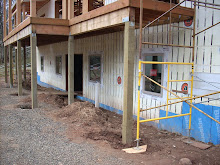
Window installation has begun. Coming up...doors!

With the last of the roof sheeting going into place, the character of our house really begins to take shape. Our roofer, Bent Nail, is scheduled for next week.

Our construction team (l to r, Matt, Greg, Frank) review some of the last details on our roof structure. The multiple hip roof is a complex system but the resulting look will be worth the additional time and effort.
3/3 - Construction supervisor

Most of our friends know of Shari's love of hummingbirds. This guy (variety yet to be identified) spends most of the day overseeing progress on 7 Pines.
Dining alfresco?
That's not really picnic table that the guys have constructed on the roof, but rather a cutting table.
2/29 - Leap Day!

The last work day in February wound up with fascia board and soffett framing complete around the front deck.
2/28 - View from northeast

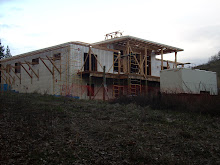
With most of the sheeting in place, the roof line is obvious and the character of the house begins to show. On the left side, the entry roof has yet to be sheeted.
Breezeway roof

The roof on our breezeway (between the garage on the right and main house on the left) was built from scratch. While it's pitch is only 2/12, the crew framed it very strong, and it will be sub-roofed with a special product known as "snow and ice."
2/27 - Roof system

After a too brief visit with Eric's parents in Arizona, we find our project has progressed nearly through a complete phase. All the roof trusses and jacks are in place and the main roof is being sheeted.

The last truss has been positioned. Next week should see roof sheeting and fascia/soffetts roughed in, ready for roofing.

Trussman Matt
Main truss

The great room ceiling is primarily bridged by a series of trusses which are 32' wide.
2/18 - At last!!

No snow and, as scheduled, we were able to get a crane on-site to place the last of the trusses.
2/14 - Mt Hood

Mt Hood is a volcano, but it's not erupting. This photo was taken a couple of blocks from our construction site. If a couple of large fir trees are ever removed, this will be our view! We chose the lot we're building on in part because it didn't have a view of the mountain or the Columbia River. View lots come with a HUGE price premium and tax assessments to match!!
Roof jacks

Roof jacks bridge from the trusses to the walls and create the rafters for our ceilings. These will be placed once the main trusses have been installed.
Entryway

The entryway roof and a section of main roof begin to take form. The main roof trusses (lower left) are scheduled to be placed on Monday. Temporary scaffolds have been built to allow for easy installation of fascia boards and soffets from walking planks (on edge in center of photo)..
2/11 - Roof trusses

What appears to be a giant game of pick-up-sticks really does have function and form. Most of the work done this week does not seem obvious as it concentrated on positioning and reinforcing trusses and jacks.
2/8 - Behind door #1 or door #2?

Last week saw the completion of the garage, and this week the doors were installed. At some point in the process, our tent trailer snuck into the garage (right door). Living conditions on the job site have improved greatly.
Put 'er there!

Our contractor, Greg, sorts out the huge puzzle that is the roof package. By directing the crane operator, he places bundles of jacks and trusses in the best position for future installation. The bundles of jacks are arranged on our main floor. The larger trusses for the east and west hips are placed "on the walls." A number of large trusses were stacked "outside" and will be placed later with a crane. These cannot be put into position until after the perimeter trusses and jacks are in place.

With the trusses in place (running left to right at the top), a ridge is installed (from the corner of the wall to the highest truss) and then the jacks fill in across the plane of the roof. A jack is made up of 2 pieces. These top fits to create the slope of the roof. A bottom piece creates the rafter which holds the ceiling.

This single truss is positioned next to the "triple." You can see that it is taller.

Trusses come in a variety of shapes, depending on their position in the roof. Stacked in the foreground are trusses which are placed at the peak of a hip. Matt (on wall to the left) guides into place the largest of the trusses which is 48' long. It is made up of 2x6s. This "principle" truss is called a triple, as it is actually 3 identical trusses sandwiched together. Estimated weight is 1200 lbs.

A hip roof package consists mainly of trusses and jacks (pictured here).
2/6 - AT LAST!!

House trusses arrive from the truss plant in Sunnyside, WA.
2/4 - Evil Snow Goddess sacrifice

Last week was dominated by snow removal. On Friday, after removing the lattest snowfall, we were "finally ready" for house trusses to be delivered. Turns out that on Saturday, we got another 3" of very wet snow. Eric shoveled that off on Monday and then fell victim to a sacrifice to the Evil Snow Goddess. The sacrifice worked and by Wednesday, the roads were clear enough to call for the trusses.
Great neighbors!

Thanks to Laura (Alfredo's wife), as Eric was wrapping up the day on Thursday, he was met by Ivan (their son) with treats. Almost makes snow removal pleasant, but more importantly, it illustrates what great neighbors we have in White Salmon.
1/30 - More snow

Don't let the road fool you. Mother Nature provided 18+" of the white stuff this week. This effected a modified work week and, while some construction took place, snow removal was the primary activity. You can see that Eric traded his shovel for a more powerful snow removal tool. Thanks to our neighbor, Alfredo.
Sunshine

Looks can be deceiving. Mother Nature didn't serve up any snow, but daytime temperatures hovered between 32 and 36 degrees during the day. Thanks to Megan and Hilary for the outerwear. Their Christmas present kept dad toasty.
House truss layout

Matt (standing) and Frank (reading tape) are laying out the positioning for roof trusses on the house.
Roof trusses on garage

The roof trusses are all in place on the garage, waiting for sheeting with plywood (foreground).
1/25 - Deck beams

The deck posts and beams are in place, ready for roof trusses. Our goal of never again needing ladders for maintenance (ie gutter cleaning) won't hold up as the beams are about 22' above final grade. These beams were set in segments by the crew using only scaffolding. Great job!
Great favor!

The truss delivery driver did us a BIG favor and placed this beam (22') over our entryway.

1/23 - Roof trusses arrive

The first of 2 shipments of roof trusses are unloaded. These trusses are for the garage. House trusses are planned for next week, depending on weather.
Breezeway, west wall

Framing on the breezeway includes an exterior door on both the east and west walls. The west wall also provides for a dog door.
1/18 - Garage/breezeway

Mother Nature cooperated and the garage/breezeway floors were poured on Monday. By Friday afternoon, walls for the garage were nearly complete and the breezeway (to the left) was framed. The white plastic wrap (lower right) covers the posts and beams to be set for the upper decks.
1/15 - Entryway

The basic deck base for the entryway is ready for upper posts and beam.
Garage and breezeway

The pour on our garage and breezeway floors was rescheduled 1 week thanks to Mother Nature's wintery present. Eric shoveled this area twice during the week.
Future location for barbeques and cold drinks

1/11 - Front deck

As the snow disappeared, we braved the mud and erected the basic deck on our south wall. Next step here will be to extend up from the new posts to support the roof covering the deck.
1/8 - Oh, boy...snow!

No sunshine on Tuesday, as Mother Nature again takes a hand in our construction project. 11" accumulation made for a cancelled work day.
1/7 - Deck footings

Footings for front deck and entryway are poured in the sunshine.
Night work

Saturday, until after dark, was spent completing the backfill and rebar for the garage and breezeway floors. The pour is scheduled for Monday. With limited weather options and a roof package on the way, deadlines have tightened up a bit.
1/5 - A new power tool!

This is a great way to dig footings for posts. 24" in diameter, 5'+ deep, the footings will support our front deck and entryway. This neat machine dug 10 footings in less than an hour. With the soil very wet and sticky, the thought of digging these with a shovel made Eric feel faint.
1/2/08 - Short week (Happy New Year!)
The holidays made for a short work week. Primary activities included more rough framing of interior walls. With all the rooms now laid out, our floor plan is taking shape, and one begins to get a "feel" of the house's final form.
Framing continues

This forest of lumber will soon become 2 bedrooms and a bath which are destined for visits from friends and family.
12/28 - Oh boy, more snow!!

Not all construction tools are high horsepower. A simple snow shovel was required to remove the 5" Mother Nature installed over night.
12/27 - Garage stem wall

Stem wall around garage and 1 side of the breezeway has been poured. Next, after forms are pulled, will be backfill.
12/21 - Moon rise over White Salmon

We have walls! Well, at least 1 partial. Framing has begun on the interior walls. Roof trusses are on order.
Garage/breezeway

Forms are in place for stem walls for the garage and breezeway. Inspection is complete and approved for concrete.
Glu-Lam

A glu-lam beam is made up of individual pieces of dimensional lumber that are glued together. It provides support which was traditionally done with a single piece of lumber. Large dimension lumber is much more difficult to obtain and very expensive.
Versa-Lam

A versa-lam beam is made up of many individual thin layers of wood. Very much like plywood, this provides for strength and support over long reaches without using any dimensional lumber.
12/20 - Great room wall

With the installation of a 30' versa-lam beam across the top of the great room south wall, framing is now complete to receive sliding door, 2 picture windows and 3 transom windows.
Southeast corner - Arxx walls
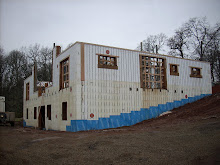
Great room opening in the wall to the left, the large opening in the right wall will become our main entrance. While the basic structure does not look that different, all the walls now contain 6" thick concrete. The top of the walls describe ceiling height. Concrete work is now complete on the house.
Great room, south (view) wall

The large opening in our south wall will be capped with a versa-lam beam across the tall wall sections. This will then receive an 8'x8' sliding glass door in the center flanked by picture windows on both sides. The windows and door will also have transom windows above for additional light.
Garage and breezeway footings

After completing the wall pour, the pump placed the concrete for our garage and breezeway footings in about 15 minutes.
All that equipment for this little spout!

Our contractor, Greg, is directing the actual flow of concrete. The pump operator (on the left) operates his truck from a remote control box hanging around his neck. The stream of concrete may seem small, but they actually can pump a full 9 yards in less than 20 minutes.
The 80' reach

Not quite to maximum reach, but pretty close.
12/14 - Main floor wall pour

You know something's up when your driveway is full of vehicles like these. The cement truck capacity is limited to 9 yards by local weight restrictions. The pump is an 80' boom.
Northeast corner

The large opening to the left of the corner will be our main entry. The tall wall section is the back of the great room. Again, with all the blocks stacked, you can see where the ceiling heights (eaves) will fall. The small door on the far right will be our back door leading from the utility room to the breeze way/garage.
12/7 - Front wall

The week's work completed stacking of all Arxx block. The large opening in the center of our south wall will be framed in and include 2 picture windows and a 8' x 8' sliding door. The ceiling height in our great room is indicated by the blocks stacked on each side of the large opening. Ceiling height in the bedrooms is indicated by the height of the blocks on the corners.
11/30 - West wall

Window bucks indicate location of windows on west wall. From right to left, 2 in our master bedroom, 1 in the master bath, and 1 in the utility room. Top of windows at 6'8" and 2 more courses of Arxx block will finish this wall.
11/29 - Living room floor

How many people do you know who need to shovel snow off their living room floor? 6" total, but construction must go on!!
11/15 - Anybody home?

You can tell if someone's home at the Boslers if there is a car in the driveway. Well, some day it will be the finished driveway. Just ahead of the pickup is the excavation for the garage footings.
11/14 - Grade

Backfill is pretty much complete. Final grade will take place after the fill settles over the winter.
11/13 - Backfill

Jake is back with the ultimate power tool. Soil backfill is going over previously placed drain rock and filter fabric.
11/7 - Main floor

Main floor deck is complete. The next steps are to backfill around the basement and set up remaining Arxx blocks for the final wall pour.
11/6 - Basement stairs

These will be the only stairs in our new home. Basement access will also be made from ground level so we will be able to live totally stair-free!
11/1 - Hart Mountain, just north of Cody

No photos are available of the construction work accomplished this past week. Eric unexpectedly traveled to Cody, WY to spend a few hours with his father who passed away late on Thursday, 11/1.
Master bedroom view

With the main floor in place, we can actually stand where the sliding door from our bedroom will look out over the future deck. Our view is directly south and would include Mt. Hood, if it weren't for a couple of large trees.
10/26 - Main floor

The first layer of the main floor consists of 82 sheets of 3/4" plywood. Once this is complete, we can begin erecting the last rows of Arxx blocks in preparation for the final wall pour.
10/24 - Floor joists

Installation of floor joists nearly complete as this point. The joists run north to south with 20' spans. By using joist hangers, rather than setting the joists on the beams, we will have an uninterrupted ceiling in our basement.
10/18 - Floor beams in place

All 6 beams are in position, bolted into the wall hangers and posts. The 2 longest beams at 31' and 29' run left to right in the middle of the photo. These are 6 3/4" x 13 1/2". The other 4 beams running across the basement are 22' long each. These are 8 3/4" x 15". The beams are designed to not only support the floor but primarily to carry the load of the roof down to the foundation. The next step will be to hang the floor joists and nail down the first of 2 layers of the main floor. The floor system will allow us to position the Arxx blocks for the final wall pour. It also "closes the box," providing support to the basement walls. We can then backfill around the basement.
10/17 - Floor beams

The first of 6 floor beams was the longest at 31'. The skill of our crane operator had all 6 beams in place in less than 2 hours! This included the time required to trim the beams to exact length.
10/16 - Floor support posts

These are not medieval jousting weapons for giants. The 3 steel posts will support the main floor beams.
Beam hanger bracket

Four of these brackets will receive the Glulam beams which run across the basement. This bracket is 8 3/4" wide and 15" tall. Note the quarter in the lower right corner. The white plastic tubes to the right of the bracket are for the future use of the resident Master Gardener. They will provide 2 outside hose bibs and water for a future irrigation system.
10/12 - Rim joist

The 1" x 15" rim joist will receive the floor joists which make up the base of the main floor. The joist is bolted into place on the j-bolts which were cast into the walls during the 2nd pour.
10/6 - 7 pines

Landscaping has begun! Not really, just some cleanup. This is a small stand of Ponderosa at the southeast corner of our lot. When a couple of unwanted Doug firs are removed, this will become the 7 pines which are the title of our blog. The cleanup reduces a potential fire hazard and improves the sight line at the intersection of Ivan and NW Lincoln. This is to keep the county road engineer happy.
10/5 - Water-proofing completed

The Blueskin, which started on the back wall, has crawled the rest of the way around the house. This view of the east wall provides a visual estimate of our final lot grade. Never did we imagine that we would have "hand-rubbed" walls!

The grade necessary to make it a true walk-out will require removal of temporary fill on the south wall.
9/27 - Main floor arrives...some assembly required.

No, the truck driver really wanted this to happen. The longest member in the floor package (top gray wrapped beam) is 33' long, 6 3/4" thick and 14" high.
9/27 - Next morning

No sooner do you get it nice and smooth, but they start cutting it into big squares. The grooves control cracking.
9:30pm!

Concrete does it's thing on it's own schedule. You can't hurry it up or slow it down. You just have to work with it. Final finish was done at 10pm.

Our concrete crew

Concrete flatwork takes a lot more hands than pouring walls. We started the pour shortly after 8am.
9/26 - Another new tool!

Pouring the basement floor utilized a "line pump" to place 33 yards of concrete.
9/22 - Ready for pour of basement floor

Eric worked through Saturday to prepare for the concrete crew pouring our basement floor on Tuesday. Insulation blanket and another another 3400' of rebar! Oh, will he be glad when all the rebar is done.
9/19 - Slight distraction

The Broughton Mill Fire started about 11:30am. Fire debris began falling on our site within an hour. The fire was less than 3 miles, as the crow flies, from our property. Our contractor is a volunteer firefighter and responded immediately and was on the fire line until 9pm. This view was taken about 1/4 mile west of our future home.
9/19 - What's blue and slick on one side, black and very sticky on the other?

"Blue Skin!" It is an asphalt based waterproofing membrane that is stuck on the exterior walls below ground level. So far, we've used 9 rolls.
9/17 - Basement fill and plumbing rough-in

After about 200 trips with the wheelbarrow to finish off any low spots in the final grade, the plumbers did rough-in for basement bathroom and future plumbing on main floor.
9/14 - afternoon

This high-tech "wheelbarrow" really beats the Bobcat at moving gravel. A 12-yard load was spread in less than 15 minutes! 89 yards total was shot in. This truck threw gravel at least 75' into the basement.
9/14 - Look ma, no hands!!

It's nice to see that the basement walls will stand on their own. Stakes indicate final fill to grade prior to basement floor pour.
9/12 - Subcontractor Eric

Now everything we put in place to support the blocks prior to pour must come down. Only to be put up again to support blocks for the upper walls once the main floor is in place.
9/7 - Center footings poured

3 5' x 5' footings for posts in basement to hold up main floor.
Coffin for subcontractor?

No! Just a footing to allow for the opening in the main floor for the stairs down to the basement.
8/31 - South wall ready for 2nd wall pour

Basement window and door "bucks" have been reinforced and braced to prevent sagging from 2nd pour. Wall area above the windows and doors has 4 horizontal runs of rebar interconnected with the lentil hooks. This provides the header which would be used in traditional wood frame construction. We passed the inspection for the next pour.
Inside view of south wall

J bolts in position which will support ledger for main floor system. Additional upright supports to hold blocks for 2nd pour.
The beginning of the main floor

3 more courses of blocks and beginning of "bucks" for sliding doors on the main floor, south wall.
8/25 - Thompson family

Slight pause in construction for a major event!
Jarrett Lane Thompson
.jpg)
Our first grandchild...what an angel.
What is it?

Diaper pin for "baby Thompson"? This rebar "stirrup," placed on 16" centers, ties the horizontal runs of rebar together over door and window openings to form a lintel. The lintel would be called a header in a stick built house.
8/22 - J-bolt hanger

The plywood attaches to the surface of the Arxx block and holds the 2 j-bolts so that the bends are in the center of the wall. Once the concrete is set, the plywood is removed and a beam is bolted around the perimeter of the wall. This forms the rim joist which supports our main floor. These are place every 4'.
Plastic snakes!

From left to right: 3" electrical, 1 1/2" gas and a pair of 1 1/2" conduits for phone, cable, etc.
8/17 - We have power!

Here's the electrical service vault that's on our west property line to provide power for us and our future neighbor.
8/14 - Trenching for utilities

The trench across Lincoln carries electricity, natural gas and conduit for cable and telephone. Now, if only the telephone lines down the middle of Lincoln had been identified before the trench was dug. 400 pair cable had to be respliced, with the phone company coming from North Bonneville to make the repairs. It was not the fault of Jake (our excavator) who also dug out our basement.
Sideways view

Pouring the basement walls - 8/14

The windows and door are reinforced for the concrete which is poured to the top of the openings.
Daylight basement, front wall - 8/9

4' of wall around the entire basement with openings for the 4 windows and sliding door on the south facing wall completed the stacking for the initial "lift." 6 rows of blocks and window/door "bucks" are in place ready for the first wall pour. Estimated that 3 pours will be needed to take exterior walls to roof line, with time to cure between pours. The complete wall structure will run to over 22' high.
8/3

Confirmed and snapped wall lines and placed most of 2 rows of Arxx blocks. An Arxx block is made up of high density polystyrene with an interconnecting web of polyvinyl. They interlock like legos and accept vertical and horizontal reinforcing rods. In addition, the blocks are tied together end-to-end and top to bottom. The standard block is 4' long, 26" tall and 12" thick. When poured, this forms a concrete wall 6" thick with insulation inside and out. The wall performs the equivalent of an R-50 conventional wall.

The first Arxx block in place
8/2
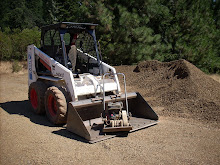
Backfill and compaction of 160 yards of material to top of footings.


The inspection of the footings revealed NO cracks!
7/27 - Footing pump

7/20

Forms ready to pour the footings.
Eric's home-away-from home - 7/3

Lot's of cut and bent rebar. There's over 500 individual pieces of rebar, bent for footing-to-wall reinforcement.
6/21 - The Big Dig

Jake, with Steve's assistance, did an amazing job excavating the basement. We ended up with some large rocks, but not so many as to complicate the project.
Staking for site line view - 6/19

That's our view, with Mt. Hood beyond!

We've got 24 gallons/minute at 528'!
6/3/07 - Well drilling

7/10/05 - Ground breaking!

Eric's examining one of 4 holes dug for the "perk test" for our future septic system
